Woo Hoo your here!! Hi guys,I decided to start this blog to keep you guys updated on what I'm doing and whats new in Nature's Essence. I have a passion for making candles and soaps and other arts and craft thingies, and I will be sharing tips and tricks with you along the way! I also wanted to mention I will be sending extra samples with every order! So please stop in my shop and take a look around! :D Talk to you soon! With love, Dani

Wednesday, September 1, 2010
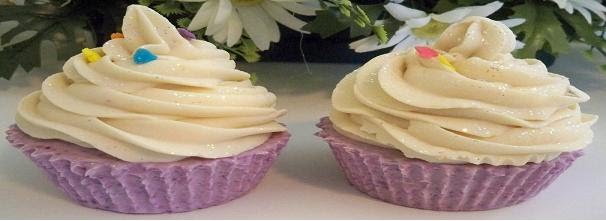
Cupcake Frosting
In trying to experiment with which way is easier, faster and most effecient way to put the frosting on the cupcake soaps, I came to the conclusion that frosting the soap right after pouring into the molds is the best way. I split my soap in half, I scent and color the first half (for the cupcake base) I make sure my soap is at a thick trace before I pour it into the cupcake mold, I even it out, bang it lightly a couple of times to get any air bubbles out, it also helps to get a nice even, flat top. At this point I try to move fairly fast so the soap dont get too hot for me to pipe, I go back to the remainder of my soap, color it a different color and scent (optional), and blend it more until it is very thick (frosting like consistency), I pour it into my piping bag and take it right on top of the cupcake I just poured and I start to pipe it. I start in the center and go around and mound it up and around as high as I like it, then make a peek. After I'm done with all of them, I lay a thick towel down and place the cupcake pan on top, I get a large box (big enough to cover your cupcake tray without touching the frosting tops) and cover it, then I insulate the top and sides of the box and let it sit for 24 hours before poping them out. Then I sprinkle the cosmetic glitter on top to dress it up, I find If I sprinkle the glitter AFTER the soap has set, the glitter seems to shine more, I guess the heat kinda makes it a bit dull. But if your sprinkleling sugar candies, then that you should do as soon as your done piping so they can stick to the soap. I found this way was alot better than pouring the base of the cupcake then coming back to it the next day to pipe it, and also, this way your frosting REALLY sticks on to the base, (I have bought cupcake soaps in the past and wound up with the frosting in one hand and the base in the other after a bath or two). So, Just make sure you pour at a thick trace (but thin enough that it can flow right into the mold, you dont want to glob it in), then go back to the remainder soap and beat it a bit more to get an even thicker trace and pipe! Hope you give this a shot, cupcake soaps are such fun to make and people love the way they look! Love, Dani
Saturday, August 28, 2010
Got Milk?????
Ok, so people have asked me what is the best way to add milk to your soap receipe. Well, I have to say this, adding milk can get a little bit tricky. After a few times of testing, trying and twicking I finally found that the best way is to freeze the milk and add the lye on it very very slowly and stiring stiring stiring, it takes a little longer than if you were not adding milk as your liquid, but that final bar is so worth it! I remember way back when, in the beggining of my soapmaking days, how frustrated I would get trying all kinds of methods of adding milk to my soap, only to end up with a globy clumpy mess, if your into soap making you probably know what I mean, but thank godness those days are over, thanks to the freezing method. So for those of you you have asked, this is what works for me... hope that helps! Love, Dani
Wednesday, August 18, 2010
CPHP Soap
HI guys,

 Ok... so I am really loving my cold process hot process soaps, I have always liked the convenience of hot process because you can use it right away after you cook it, I always use to cook mine in a crock pot. The only thing I hated about that was the you couldnt swirl colors in, and I was never happy with the bumpy top on the soap. But....now im using the CPHP method and I love it! I pour my soap in my mold as if it was cold process, do my swirling and top decorations as I would normaly do, BUT, instead of insulating it... I pop it in the oven at 170 degrees for three hours, then I let it sleep in the oven undisturbed, and when I finally pull it out... It looks just like a cold process bar! I LOVE IT!! :D
Look at the photos.. This is a hot process bar, yet it does not look like one!
You can do this too! Love, Dani


Look at the photos.. This is a hot process bar, yet it does not look like one!
You can do this too! Love, Dani
Subscribe to:
Posts (Atom)